Showing posts with label Magnets. Show all posts

Saturday, 15 August 2020

3D-printing Feudal Guard... pt. IV

It's time for yet more Feudal Guard...

Most models in my Kill Team have something that sets them apart, yet the overall style of the Feudal Guard line easily ties the force together (though the orange might help too)...

With the release of the first upgrade pack for the Feudal Guard (as part of the Patreon release for july), the selection of different parts available is increased considerably. Especially the new helmets add a lot of character and are an easy way to individualise an otherwise faceless miniature. The additional arms with weapons make it very fun (and easy) to make your own leaders. 

All these helmets add a lot of options...


After the latest sale on CGtrader I have all the Feudal Guard sets (with the exception of the character models) and the possibilities are almost endless... Currently I am looking at ways to build a Necromunda gang with the Feudal Guard bits...

And to make it even better, another Feudal Guard upgrade pack is set to be released in august...

Technically not a part of my Kill Team, but I couldn't resist printing and painting a Sentinel... Most likely, he won't be the last either...

'Der Schleicher' or 'The Stalker'...


This model is huge, it towers over the regular infantry and it makes even the Ogryn look small. This model is nicely detailed and shares the overall style of the rest of the Feudal Guard range. I tried to give him a dynamic pose.


With the addition of the Sentinel, I can no longer call this a 'Kill Team-only' project, but that's fine by me... Typical, really, the Kill Team isn't even completed yet and I am already looking to take the next step...


And what would be better than to print a whole Tank? The obvious answer would be 'more Tanks', but that's something for another time... Printing this model was done in four full prints, taking me the better part of two days and a fair bit of resin... Totally worth it!

This kit comes with A LOT of options...

All the options are easily magnetized...

I had very little problems printing this big model, only the track guards warped a bit, but not so much that I could not use them... I am halfway through painting this Tank, here's a quick preview...


Yes, it's orange, too... 

This kit comes with all the options currently in the Astra Militarum CODEX for the Leman Russ Battle Tank and thanks to the clever design (which adds the option for magnetizing EVERYTHING) you can adapt the model to every possible configuration...

More Feudal Guard coming soon!

Friday, 3 April 2020

3D-printing tanks... Pt. IX: T18 Boarhound

I love printing unusual and less-used vehicles, and while Thingiverse is a true treasure-trove not everything I am looking for is available there...

One of the vehicles I have been looking for, is the T18 Boarhound armoured car...

I really love the design of this vehicle... 
I wanted to add this armoured car to my platoon of Staghounds or have it serve as a command vehicle in a British armoured car company... It's initial version was armed in the same way as the Staghound Mk. I and is't a nice miniature to add some variety.

As with the Staghound, this is a very large armoured car...
With a Sherman and a Staghound for scale...
Not only is it almost as big as a Sherman, it weighs just about the same too... This is one impressive armoured car!

I found the Boarhound on Shapeways and contacted the designer (Kampfflieger) to ask him if the stl-file was available for download. He quickly responded and directed me to his Patreon: Panzer Printer... Apart from the Boarhound there are a lot more cool designs, mostly of rare vehicles. The designs themselves are pretty good and there's a wide selection of models to choose from.


I had to re-scale the design from 1:72 to 1:100 and I have adapted the model to accommodate a set of small magnets. As an added bonus, the design itself is already hollow and open at the bottom; resulting in a rather economically effective print, despite it's size...

However, that proved to be something of a hindrance, too... The walls of the hull are so thin, the vehicle started warping, even after I had cured it. I think it's because the design was originally intended to be printed by Shapeways, and they use a different technique...

It might be hard to see, but the thin sides are flaring outwards...
Above you can see the first two printed hulls. At first I thought the warping was caused by the supports I left inside the hull (I didn't bother removing them as you wouldn't be able to see them anyway), but the second print suffered from the same problem, despite having all of the internal supports removed. I took extra care while cleaning the model, but it started warping even before I got the chance to fully cure it...

Screenshot made while in Tinkercad...
To counter the warping I thickened the walls of the rear half on the hull and I inserted blocks to connect the axles and strengthen the overall construction.

The model on the right features the strengthened frame...

Here you can see the adaptation I made to accommodate a small magnet.
I also added a few pieces of stowage...
The stowage is from Thingiverse. The pieces are designed by TigerAce1945 and can be found HERE... Seeing how easy it was to add some detail to the (already awesome) model, I regret not trying it any sooner...

While cutting up the file and re-scaling the model I forgot I had already re-scaled the turret... Hence, the first turret came out much too small, being scaled down twice instead of just once... For the second print I replaced the file and printed it in the right scale...

The difference in size is obvious...
The warping and the re-scaling error are all part of the learning experience... In the end the Boarhound turned out great and I will be printing a couple more!
I really, really, really like this model; it's a clean design and nicely detailed. You can expect to find many more of Panzer Printer's designs here in the future!

Saturday, 14 March 2020

3D-printing tanks... pt. III: Ram

Another tank I am keen to add to my collection is the Canadian built Ram cruiser tank... While this vehicle won't fit in with my U.S. or German forces (well, I could always substitute one or two for a couple of Shermans), it might just be the start of a British/Canadian project. At the very least it will see service in our games of What a Tanker!


The files for this model can be found here, courtesy of Thingiverse and the designer, m_bergman...

This is what my desk looks like...
I have set up several files with different configurations. I decided to print the early and late version, both with the 6-pounder gun. After a little bit of cutting and pasting in Tinkercad I adapted the design to accommodate a set of small magnets. I also hollowed out the end of the gun's barrel...


The first two Rams were laid-out with a horizontally printed turret. While the rest of the vehicle printed quite well, this resulted in two crooked barrels. Apart from the barrels, the bottom of the turret wasn't as tight as it should be due to support failure and the hulls suffered some damage due to excess support (both totally my own fault).

Crooked barrel...
The difference in quality is obvious. 
After that I decided to tweak the set-up in Chitubox. I placed the turret verticaly, with the barrel pointing up and I removed a couple of unnecessary supports which were damaging detail on the hull.

Little detail shot of the damaged portion of the fenders...
Hollowed out barrel and magnethole (if that's even a word)...
The two versions... Both miniatures still need some clean-up and curing but
I am happy with the results.
The second and third batch came out a lot better. Which demonstrates (again) that working with Chitubox is a learning experience...

Third batch, fresh out of the printer...

For the fourth run I have set the layer height to 0.025mm instead of the standard 0.05mm... Doubling the print time, but worth waiting for if it will improve the quality of the model even further.

Left the print at 0.025mm and Ram on the right at 0.05mm...
Admitted, the difference is small, very small, barely visible with the naked eye and I doubt it will be visible at all when the miniature is painted. But I think it's worth the extra time...

Saturday, 2 November 2019

Going to town... pt. IV

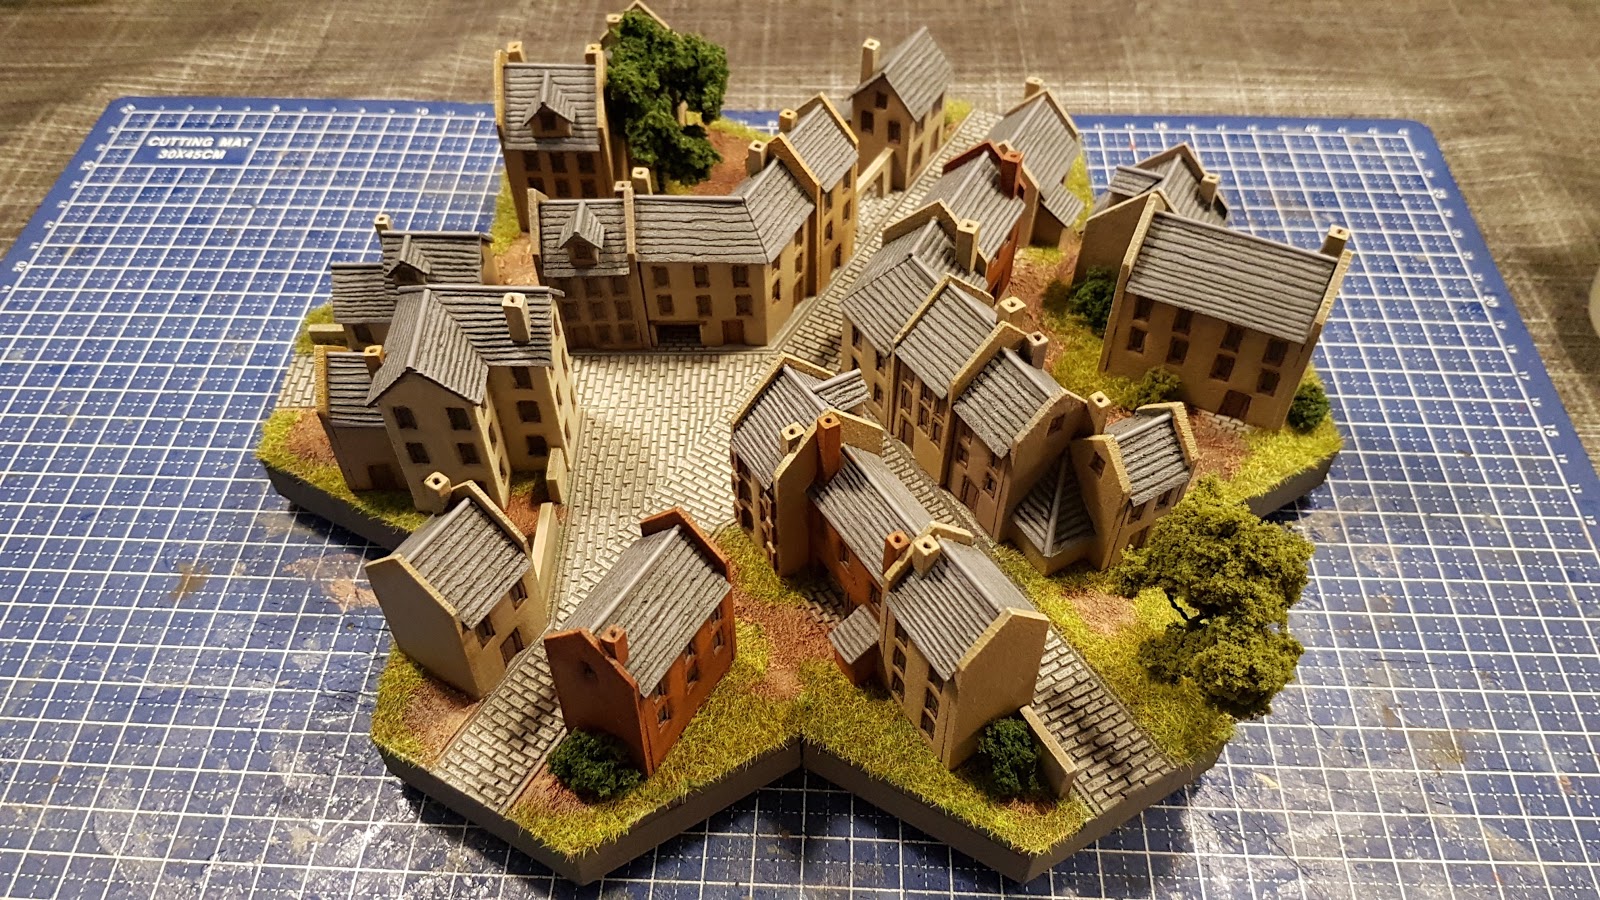
The first multi-Hex town module is finished...

All grassed and with a couple of trees added... 
About half these buildings are magnetized and are thus detachable, this should help to keep the streets easily accessible, even for fat-fingered gamers like myself...

With the detachable buildings removed, there's plenty of space to move around
Here are a few shots from different sides...


I tried to use different colours for the houses. The different colours are there to break up the uniformity of the buildings but without adding too much contrast (if that makes sense). I used several muted browns and yellows, which, when combined, give a nice overall appearance and add a suitably sombre look to the town...

I am thinking about adding another tree or two, but I am unsure as to whether that would limit the accessibility of the piece...


Friday, 25 October 2019

Going to town... pt. III

When building my first multi-Hex town module it quickly became apparent that, in order to be able to move miniatures around, some of the buildings would have to be detachable...

To achieve this I turned to magnets. I inserted magnets in the buildings I wanted to be able to remove and mirrored the magnets in the Hex base.

 Mind, the module is still a long way from being finished...

The streets are narrow, the buildings tall...
I looks good (I think), but is it practical to game on?
The module with the detachable buildings...

They might be small, but four of those small 2mm magnets
can secure a block of houses without any problems...