Friday 22 November 2019

Laying the foundations... pt. II

Expanding the Hex terrain means I need more snowflakes. A lot more...

As I mentioned before, these are rather time consuming to cut. However, they are also indispensable if you want tight fitting Hex surface.

Over the last couple of days I managed to complete nine sheets of snowflakes (54 snowflakes in total, the sheets measure 2x3 snowflakes, glued together for improved cohesion).

These will be enough to expand the surface from the current 6x2 to 7x3 sheets (for a total of 126 Hexes)... This will easily be enough for a regular sized game or battle. This surface is just under a quarter of my total table surface, so there's still a way to go...

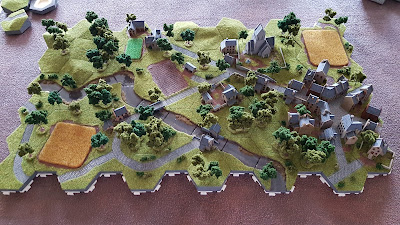
The recent expansion...  Now we're getting somewhere!

The landscape is taking shape... Mind the gap though...

The expansion of the snowflakes has overtaken my stock of terrain Hexes... I am going to make more basic Hexes to fill all the gaps.

The added space gives me enough room to deploy the entire river set. I like the meandering nature. In combination with the hills, the result is oddly organic, despite all the Hexes...

Sunday 17 November 2019

Hexes, Hexes everywhere... pt. VII

With the completion of the new batch of hill Hexes I rearranged the set-up to include a large hill...


I rerouted the river to make some space for the hilly terrain. I think it 
certainly adds a bit more variety and visual interest.

Waking up on Hell's Highway...

This weekend we spent the night at a hotel overlooking Hell's Highway, the route between Nijmegen and Arnhem...

Dawn over the Waal bridge...
Our hotel room was situated on the 13th floor of the hotel, looking south over Nijmegen... In the distance you can see the Waal bridge, barely visible in the early morning light.

3D-printed reinforcements...

To augment the GHQ Micro Armour I picked up at Crisis last week, I placed an order at Shapeways... For those who aren't familiar with this company, they offer a wide range of 3D-printing services... Primarily, you can get your own designs printed, but you can also order prints from their well stocked store (filled with products from various designers)...

In the past I have purchased several 15mm vehicles for my FoW Late War Germans, but these were the first 6mm miniatures I ordered...

While not cheap, these small models are a lot more affordable when compared to larger scale printed miniatures... Due to the difference in cost, I will only use 3D-printed miniatures to get my hands on vehicles that are otherwise unavailable...

First on the list was a mixed set, containing two of each: Dicker Max and Sturer Emil...

The 3D-printed miniatures in their delivery form...
Dicker Max...
Originally designed as a bunker buster to tackle the French Maginot line, it later served as a tank destroyer... Armed with a 10.5 cm cannon it is a fearsome weapon.

Sturer Emil...
And when the 10.5 cm cannon of the Dicker Max isn't enough, there's the 12.8 cm gun of the Sturer Emil... Both of these vehicles were built in very limited numbers. In fact, only two were built of each type.

I also purchased a set of 8.8 cm (SFL) auf Zukraftwagen 12t (Sd.Kfz 8), better known as the Bunkerflak or Bufla...

One of the more interesting vehicles of the period, in my opinion...
The 3D-printed miniatures in their delivery form... 

The Bunkerflak, as the name suggests, was originally designed to tackle bunkers, in particular the Czechoslavakian border defenses. As these were bypassed without any real fighting, the vehicle later also served as tank destroyer. Most German anti tank guns of the time had little to no success tanking on the heaviest enemy tanks like the British Matilda and French Char 2B. The mobile 8.8 cm had no difficulties with those targets...
By no means a small target, these pack a serious punch... While they have little to no defensive capabilities (the halftrack is only lightly armoured and the gun's crew is very exposed indeed), offensively they can take on anything the enemy has to offer, be it bunkers or tanks...

Speaking of the enemy... For my battle buddy I ordered a French Char 2C...

Bigger than a Tiger II (but slightly lighter), with a crew of 12 or 13, depending on the variant...
While these saw only very limited, if any, use, this tank is too cool to pass up... A product of the First World War, only ten were ever constructed. These landships were, and still are, the biggest tanks ever built!
All were destroyed by the French to prevent them from falling into German hands...

The Char 2C in it's delivery form... 
The 3D-printed models are as crisp as I expected them to be from my previous purchases. They might be more expensive than GHQ metal models, but it's the only way to get these less mainstream vehicles... And when ordered in small numbers I can still get away with it...

The miniatures are nicely detailed but lack the finer touches that can only be achieved in metal casting. Even so, this is the first order of many, I suppose... There are a lot of other, less used tanks and vehicles I want to add to my collection...

Wednesday 13 November 2019

What's that coming over the hill... pt. II

I have finished the hill Hexes I started the previous week...

All grassed up...

To fit in with the rest of my Hill Hexes I decided to put some trees on some of them... There is something about wooded sloping hills... I tried not to make them too densely forested so there still should be enough space to move models around.


The finished Hexes... 
I used a few tufts of the grass I purchased at Crisis. I like the look of them, but they might be a bit too tall... I think I may shorten them a bit

Didn't have the time yet to build a  set-up with the new Hexes, but will do so as soon as possible...

Sunday 10 November 2019

Cooling down from CRISIS 2019... The CRYPE is real! pt. III

Visited Crisis Antwerpen yesterday, and it was as good as ever... It must have been the 9th or 10th time I visited the show and it seems to get bigger and better every year.

This year, my main interest was getting some 6mm stuff. Several weeks ago I had placed a pre-order at Magister Miliitum. Quite ideal, as they have the option to pick up your order at one of the shows they visit. They had the order ready, neatly packaged, 100% complete and including the original order form.

About 2/3 of that order was for me, the remaining 1/3 was for my battle buddie. He ordered Early War French and British miniatures...

A total of 21 blisters of GHQ Micro Armour, my part of the order...
All Early War Germans.
I have already begun assembling and painting these, but that's something for another post...

Next on my list were some rulesets... I picked up the Crossfire rulebook first, which actually looks more like a magazine than a proper book; all black and white, soft cover and staples...


Astoundingly, this cost me €30,- I really hope the rules are as good as I have read/heard them to be...


Funny enough, I also paid €30,- for the two hardback, full colour Battlegroup books (picked those up at the PSC stand)... About 200 pages each, filled with interesting background information on the theatre, army lists, scenarios and inspiring pictures. I only intended to replace my digital rulebook with the paper one, but couldn't pass up on their special CRISIS offer... The army lists from both these books (Tobruk and Torch) should be compatible with our Seelöwe campaign...


And right across from the guys from PSC was the trade stand from Too Fat Lardies, where I purchased the I Ain't Been Shot Mum book. Forgot to pick up the cards though...

Next was some paint for my Early War German Panzers and Infantry, which I picked up at Foundry.


And last in the bag were some packs of grass tufts...


All in all a good haul! Assembling and painting the Micro Armour has started and we are getting ready for our first 6mm game.

Already looking forward to CRISIS 2020...

Wednesday 6 November 2019

What's that coming over the hill...

Would you look at that, it's more hills...

In one of the previous posts I mentioned I needed more hill Hexes. I have made about a dozen, right at the start of this project, but these aren't nearly enough...

The hill Hexes can be sorted in different models, depending on the number of high points. I have made several hills with one high point, two high points, three and four high points.

Examples of hill Hexes...
Picture taken from the Hex Terrain Toolkit Kickstarter.


Making the most of a free afternoon, I have made a whole bunch of new hill Hexes. Including a couple of double level hills, Hexes on which the hills rise two levels. These are indispensable when constructing a larger, higher hill. Something I found out while setting up my Hex terrain and trying to build some high ground... Without these Hexes it's highly likely you'll end up with vertical gaps.

The bare Hexes, stacked and glued two or three high.
These form the basis of the hills...

The basic shaping of the slopes is done.
The shape is still irregular and a bit jagged here and there...


This relatively small set of hills does take 39 Hexes, six double layers and nine triple layers... While cutting basic Hexes doesn't take up a lot of time, cutting 39 does... All worth it though, these are a welcome addition to my ever expanding set of Hexes...

After some firm sanding the hills look a lot better...

The top of the Hexes is painted green, as a base for the grass.
The sides are painted in a dark grey...
These will be left to dry properly overnight. The next step is applying a layer of glue and grass... After that, some of them will get some trees or bushes applied to them.

Saturday 2 November 2019

Hexes, Hexes everywhere... pt. VI

I have finished the first multi-Hex, below are some pictures of the newest addition integrated in the rest of the Hex terrain...  


With the addition of this new module there are enough buildings to make a decent sized little village... While I was setting up, and even more now, posting this update and looking through the pictures, I realised I need a bigger surface...


Going to town... pt. IV

The first multi-Hex town module is finished...

All grassed and with a couple of trees added... 
About half these buildings are magnetized and are thus detachable, this should help to keep the streets easily accessible, even for fat-fingered gamers like myself...

With the detachable buildings removed, there's plenty of space to move around
Here are a few shots from different sides...


I tried to use different colours for the houses. The different colours are there to break up the uniformity of the buildings but without adding too much contrast (if that makes sense). I used several muted browns and yellows, which, when combined, give a nice overall appearance and add a suitably sombre look to the town...

I am thinking about adding another tree or two, but I am unsure as to whether that would limit the accessibility of the piece...


Musings on terrain... pt.II

With the completion of the church and the first real village module being almost finished, there's the question of what to add next... The river set is already being augmented, both with the new bridges and the second village module (which also covers the expansion of the village/town).

With all those 'special' Hexes and modules being completed, it might be a good idea to pay some attention to the basics before embarking on the next ambitious project...
  • I am going to need more snowflake Hexes. As my collection grows, so should my foundation layer of snowflakes. I want to be able to fill a bigger surface, big enough for a serious battle, at least twice the size of my current set-up.
  • More basic grass Hexes... Just regular, flat Hexes... All the gaps between those special Hexes and modules need to be filled.
  • Hills! I want more vertical versatility... I really like the hill Hexes I have made so far, but the set is too small to be able to make any 'real' hills... 
  • Roads... With all the recent additions, like the houses with road access, I will need more roads, preferably Hexes with three or more exit/entry points...
Both the basic, flat Hexes and the hill Hexes are relatively easy and quick to make. I should have plenty of styrofoam, too. I hope this expansion can be realised soon... 

After that? I have some plans regarding building a quarry, mostly because I want to try out the cliff module of the Hex Terrain Toolkit, but also because I want to use it as a V2 launch site... That would make for a great objective, game wise...

For our what-if Seelöwe campaign I would like to build a RAF airfield and some radar stations, but the how and what part is still unclear.

I also want to add some damaged buildings to my Hexes. These should be simple enough to make and add some visual interest to the landscape....