My blog about wargaming and 3D-printing... Everything and anything between 28mm, 15mm, 20mm and 6mm, Fantasy, SciFi and WW2, plastic, plaster, styrofoam, resin and metal, terrain and models...
To serve as infantry support in my British/Canadian company I purchased two boxes of 15mm or 1:100 Late War British infantry and heavy weapons from Plastic Soldier Company...
A quick review of both boxes...
The Late War infantry box contains 144 models, including officers, PIAT-teams and light mortars. The models come in a nice variety of poses and the large number of miniatures means this box is enough to field a complete company of three platoons and command.
The Late War heavy weapons box contains Vickers HMG's, 3-Inch and 4-Inch mortars and a flamethrower. The set contains four of each of the heavy weapons, enough to provide the basic suport an infantry company needs.
Infantry sprue, fully packed with models...
Heavy weapons sprue...
As far as I can tell, uniforms and gear are all historically correct. Furtermore, the detail and character on these miniatures is very good.
Instruction manual... Quite straightforward...
For now I needed just a single platoon, but the rest of the models will be built as soon as I expand this company. I haven't even really started on the heavy weapons yet... The boxes contain enough models to build three platoons of infantry.
The completed platoon...
No PSC but 3D-printed... These Ram Kangaroos will serve as transports for the infantry platoon...
The good
The boxes offer good value for money and cover all the basic needs whether you are starting an infantry company from scratch or just want to add some support to an armoured force...
The models are very detailed and I quite like the character of the models. I think these will paint up nicely.
The wide variety of poses means you can make each base unique.
The bad
None... Reallly? Nope... Well... Maybe... If I needed to offer some critisism it would be that some of the sprues had quite a bit of flash, but nothing that couldn't be solved with a sharp knife...
The verdict
PSC is always my first stop when it comes to buying 15mm miniatures. These Late War Brits are yet another great example of the quality PSC delivers. I will be back for more...
Work hasn't slowed down yet, but I desperately needed to do some hobbying...
I decided to build a 15mm or 1:100 M60A3 from Plastic Soldier Company, and because I thoroughly enjoyed building it I thought I should write up a little review...
Because it is not connected to any of my current hobby projects, this kit has been sitting on my desk for quite some time now. A shame, really, as it is such a nice model...
The details...
The box contains five models...
The building instructions, as easy as it gets...
Both sides of the sprue... All the parts needed for one M60A3...
The tracks consist of two parts which easily snap together...
There is no way to get this wrong...
The headlights are a nice bit of detail... A pair of tweezers proved
to be essential here...
Crips detail and a tight fitting model kit...
The 'finished' product...
The model has two hatches that can either be modelled open or closed. For this first model I opted to keep all the hatches closed.
To put this tank together I used a sharp hobby knife, a pair of tweezers and a small drill. For the main construction I used plastic glue, which I always prefer when working with plastic. The magnets were glued with super glue.
After the main assembly I usually add a brass antenna, but I must somehow have misplaced my container of plastic and brass rods. This final detail will be added as soon as I find them again...
The verdict...
The kit has everything I have come to expect from a company like PSC, crisp detail, tight fitting parts, high quality plastic and not a single defect to be found... Parts like the headlights or the stowage rack at the back of the turret really add to the model.
The parts were completely free of flash, so getting them ready for assembly was as easy as cutting them from the sprue. The model is easy to build and goes together really well, if I hadn't magnetized the hull and turret I would have been able to assemble it in a couple of minutes.
In addition to the complete vehicle, the kit comes with two crew and some additional stowage.
The model is obviously designed for gaming, thus some of the smaller parts are a bit thicker than they should be, scale-wise. Fine by me, as I would end up breaking them if they were any thinner...
Extra work...
I took a minute to drill out the muzzle of the barrel. Nothing fancy, just a small hole to add some detail to the barrel...
Because of my slight magnet fetish I had no other option than to magnetize the turret and hull (not because the system provided doesn't work, because it does). It takes a little bit more time and effort, but this makes my tanks compatible with my smoke plumes, which, you guessed it, are also magnetized... I have a fair number of PSC miniatures in my Flames of War collection, and all have received a similar treatment.
Below you can see the extra steps I have taken to add the magnets...
Step 1: drill the holes...
Step 2: cover the holes...
Step 3: put the magnets in the holes...
As you see, it's not exactly rocket science... I use 5mm magnets and a 5.5mm drill. The white bits are just scraps of plasticard, cut to size. These are glued to the inside of the model to provide a surface to which the magnets can be attached.
To augment the GHQ Micro Armour I picked up at Crisis last week, I placed an order at Shapeways... For those who aren't familiar with this company, they offer a wide range of 3D-printing services... Primarily, you can get your own designs printed, but you can also order prints from their well stocked store (filled with products from various designers)...
In the past I have purchased several 15mm vehicles for my FoW Late War Germans, but these were the first 6mm miniatures I ordered...
While not cheap, these small models are a lot more affordable when compared to larger scale printed miniatures... Due to the difference in cost, I will only use 3D-printed miniatures to get my hands on vehicles that are otherwise unavailable...
First on the list was a mixed set, containing two of each: Dicker Max and Sturer Emil...
The 3D-printed miniatures in their delivery form...
Dicker Max...
Originally designed as a bunker buster to tackle the French Maginot line, it later served as a tank destroyer... Armed with a 10.5 cm cannon it is a fearsome weapon.
Sturer Emil...
And when the 10.5 cm cannon of the Dicker Max isn't enough, there's the 12.8 cm gun of the Sturer Emil... Both of these vehicles were built in very limited numbers. In fact, only two were built of each type.
I also purchased a set of 8.8 cm (SFL) auf Zukraftwagen 12t (Sd.Kfz 8), better known as the Bunkerflak or Bufla...
One of the more interesting vehicles of the period, in my opinion...
The 3D-printed miniatures in their delivery form...
The Bunkerflak, as the name suggests, was originally designed to tackle bunkers, in particular the Czechoslavakian border defenses. As these were bypassed without any real fighting, the vehicle later also served as tank destroyer. Most German anti tank guns of the time had little to no success tanking on the heaviest enemy tanks like the British Matilda and French Char 2B. The mobile 8.8 cm had no difficulties with those targets...
By no means a small target, these pack a serious punch... While they have little to no defensive capabilities (the halftrack is only lightly armoured and the gun's crew is very exposed indeed), offensively they can take on anything the enemy has to offer, be it bunkers or tanks...
Speaking of the enemy... For my battle buddy I ordered a French Char 2C...
Bigger than a Tiger II (but slightly lighter), with a crew of 12 or 13, depending on the variant...
While these saw only very limited, if any, use, this tank is too cool to pass up... A product of the First World War, only ten were ever constructed. These landships were, and still are, the biggest tanks ever built!
All were destroyed by the French to prevent them from falling into German hands...
The Char 2C in it's delivery form...
The 3D-printed models are as crisp as I expected them to be from my previous purchases. They might be more expensive than GHQ metal models, but it's the only way to get these less mainstream vehicles... And when ordered in small numbers I can still get away with it...
The miniatures are nicely detailed but lack the finer touches that can only be achieved in metal casting. Even so, this is the first order of many, I suppose... There are a lot of other, less used tanks and vehicles I want to add to my collection...
The Hex Terrain Toolkit, henceforth to be referred to as the HTT, was originally launched as a Kickstarter, making it's funding goal without much difficulty. Mind, I wasn't involved, or even aware, of the Kickstarter, I stumbled upon the HTT by happy accident while searching for a new project...
Fortunately for me, when the Kickstarter ended, the designer of the HTT made the product available to the public at large...
As I have been using the HTT for several weeks now I don't have any fancy unboxing video or a lot of pictures for this review. But, after cutting 'a few' Hexes, I can offer my experience with the HTT...
The contents...
In the picture below you can see the delivery form of the HTT, Six sheets of plywood filled to capacity with components. I barely remembered to take a picture, you can see I had already started taking out the components, before getting started for real...
The only picture I have of the unused HTT...
The costs...
The HTT can be bought in several different packages. I opted for the most complete set, including all the different options. I have used most of these, but not all, yet...
This complete set, called the Professional Toolkit costs £80,- With shipping that's around €100,- (should be about the same in $). For that you get six sheets of precisely laser-cut plywood containing all the pieces you need.
The technique...
The HTT is designed to be used with a handheld hot wire cutter. As I use a Proxxon model with a table I had to make some minor adjustments to the basic Hex-module and the depth cutter. Apart from that I can use the HTT as intended.
The design is extremely precise and accurate. All the different pieces correspond perfectly, no need for further adjustment.
The HTT works with just about any type of styrofoam that can be cut using a hot wire cutter. I use a rather dense type of styrodur, but any kind will do... I think that's one of the strengths of the HTT, you can use it with (potentially free) styrofoam packaging or left-over bits of insulation.
A pile of scrap pieces of styrofoam,
left over after cutting a dozen or so Hexes...
Cutting basic Hexes takes no time at all, and, as with most things, practice makes perfect. The other, more specialised Hexes like hills and rivers, take a bit more time.
A few basic Hexes...
The designer of the HTT has his own YouTube channel, filled with informative videos on how to utilise the kit to it's full potential. These videos played a large part in convincing me to purchase the HTT.
The design...
The HTT contains pieces to make a whole assortment of different Hexes. Most important are the standard, flat Hexes. Next are the hills, you can make these in several configurations. River and cliff Hexes can also be made in several different variations. The pictures below (taken from the Kickstarter page) show the Hexes that can be made with the HTT....
From left to right, hills with one, two, three and four high points...
An example of the set-up used to cut a hill Hex...
All the different river Hexes, including bends and wide and narrow rivers...
The set-up for cutting a river Hex, in this case a bend...
A few river Hexes combined with regular, flat Hexes...
The assorted cliff Hexes and even more hill Hexes...
The river and cliff Hexes can also be used as trenches and dungeon corridors. The only limitation is the users imagination (of lack thereof). I can safely say I haven't explored the full potential of the HTT, yet...
In addition to standard sized Hexes, the HTT also contains the components to make half or quarter Hexes, used to smooth out the edges of your terrain. I personally don't use these as I actually like the shape of the edges...
To further illustrate the versatility of the HTT I recommend watching this video, made by the designer of the kit...
Below the surface...
The Hexes showcased on this blog are just the surface of it all... What's below is just as interesting and equally important! The HTT offers some clever solutions to create flexible interlocking Hexes. This system makes a frame (to keep all the Hexes firmly in place) redundant.
Hex-shaped holes and pins, risers (to allow for creating height difference in your terrain) and snowflake Hexes make sure the Hexes don't move around when used. This system comes in two different designs. I opted to use the simplified version as I won't be making half Hexes for the edges.
The Hex-shaped hole and pin system, combined with a riser and a hill Hex...
The pieces used to create the snowflakes and the hole and pin system...
Snowflake Hex and Hex-shaped hole and pin system...
An example of a foundation layer of snowflake Hexes...
An example of how the snowflakes combine with the surface layer of Hexes...
Cutting these snowflakes takes a lot of time, but for me these are well worth the effort. They keep the Hexes in place and don't allow any gaps or movement... The scale...
While I use the HTT to make terrain for 6mm (1:285) wargaming, I have seen examples in use with 15mm, 20mm and 28mm. So whichever scale you prefer, this should work just fine...
The verdict...
Sure, it takes a lot of time and effort to create your own Hex terrain, but the Hex Terrain Toolkit makes that easy. Furthermore, it guarantees a level of accuracy you just can't get if you cut Hexes by hand. Add to that the sheer number of options provided by the kit and you have a great and very practical tool at your disposal with which you can make pretty much any kind of terrain you might need...
Now that my Company is ready for it's first tournament I figured I could do with another review... I need another Platoon of Panzers for the next tournament. Besides, you can never have enough Panzer IV, and I really like this kit...
This is by no means a new kit, as it has been around for a couple of years now (according to the PSC website it was released back in 2011).
The Panzer IV from PSC comes in a box of five (they are also available seperately). The box will retail at around £20,00.
The PSC Panzer IV kit allows you to build three different variants: the Panzer IV Ausf. F1/2, G and H. Suitable for service in mid to late war.
I will be building the Panzer IV H as an addition to my -all plastic- German Flames of War Company.
The sprue is packed with options to build all three different variants, two crew and some optional stowage, like spare tracks and jerrycans... The box also offers a one-piece track option, which is very nice. Especially the older PSC kits have tracks that are made of several parts, nothing too difficult, but the single piece saves some time.
All parts cut out of the sprue and laid out... To the left are all the pieces that are extra, either as optional stowage or those that are needed for the other variants.
The PSC Panzer IV uses a straight-forward pin and hole to connect the turrets to the hull. I prefer to magnetise all my models. This step takes a bit more time, but ensures for a smooth turnable turret and lines up with my magnetised smoke plumes which I use as destroyed-markers...
The rest of the kit goes together in just a couple of minutes. For this I highly recommend plastic glue!
All the parts fitt really well, there are no glaringly visible gaps. The Schürzen will be glued on after painting, but could also be glued on prior, whichever has your preference...
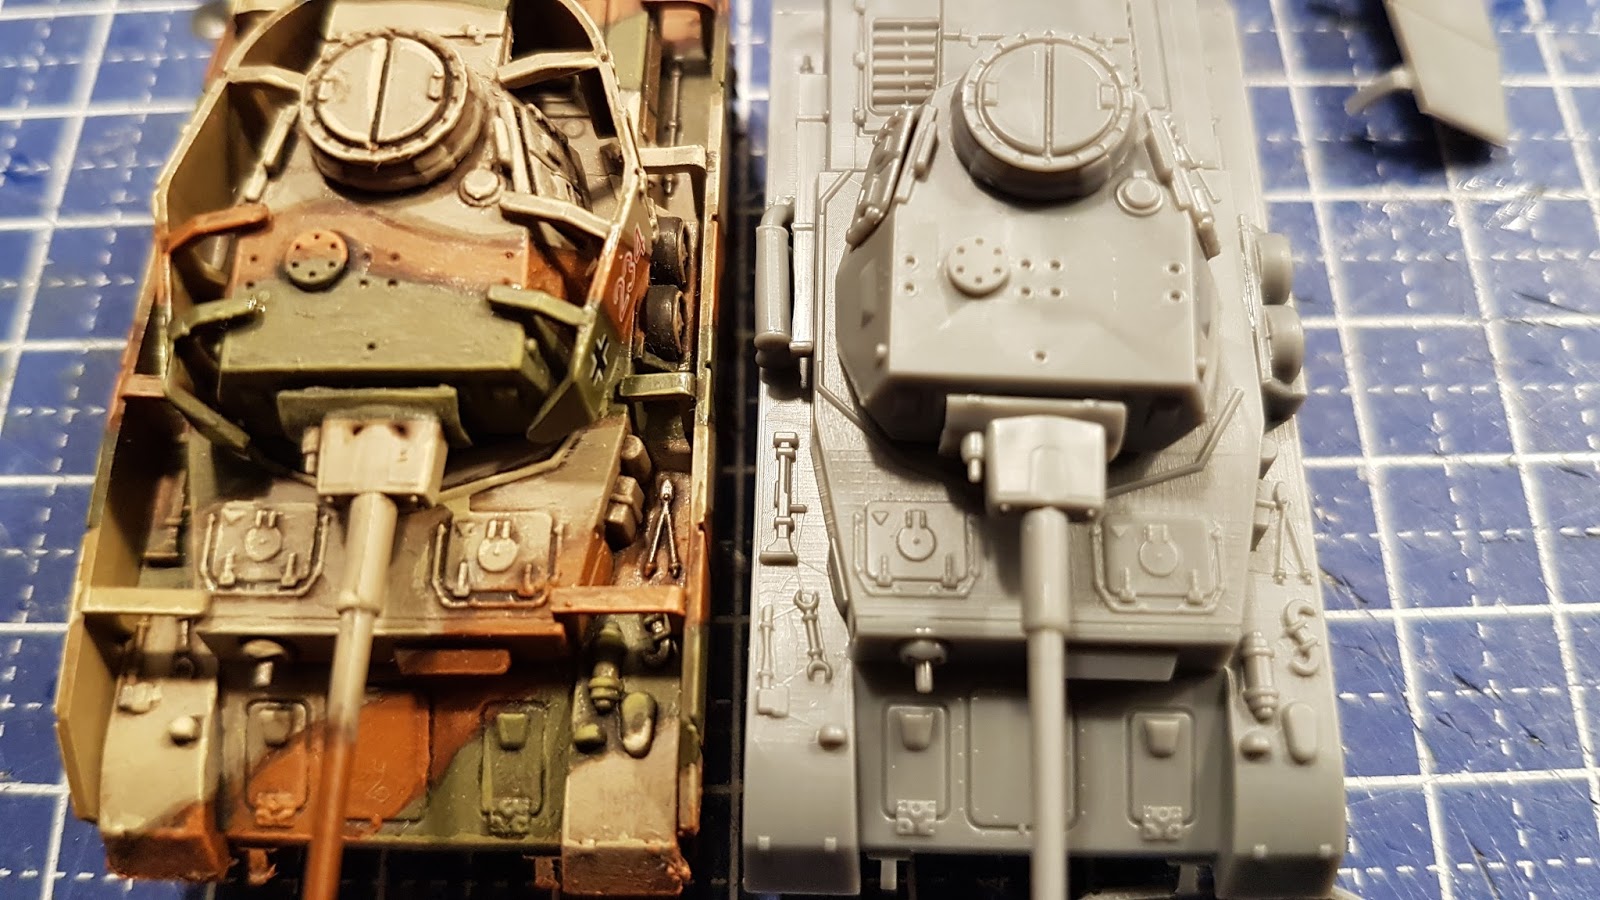
This wasn't my first Panzer IV from PSC...
I don't know if it's a deliberate fix or just a happy accident, but the dimples in the gunmount are gone... All my previous models 'suffered' from this little flaw.
Pro's:
Highly detailed yet easy to build
Three variant options, crew and some optional stowage
For my Battlegroup and/or Bolt Action project I recently picked up a box of 20mm or 1:72 plastic SdKfz 251/C Halftracks from Plastic Soldier Company. For my Flames of War Germans I have several of their 15mm kits. Picking up some of their 20mm kits seemed like the obvious choice..
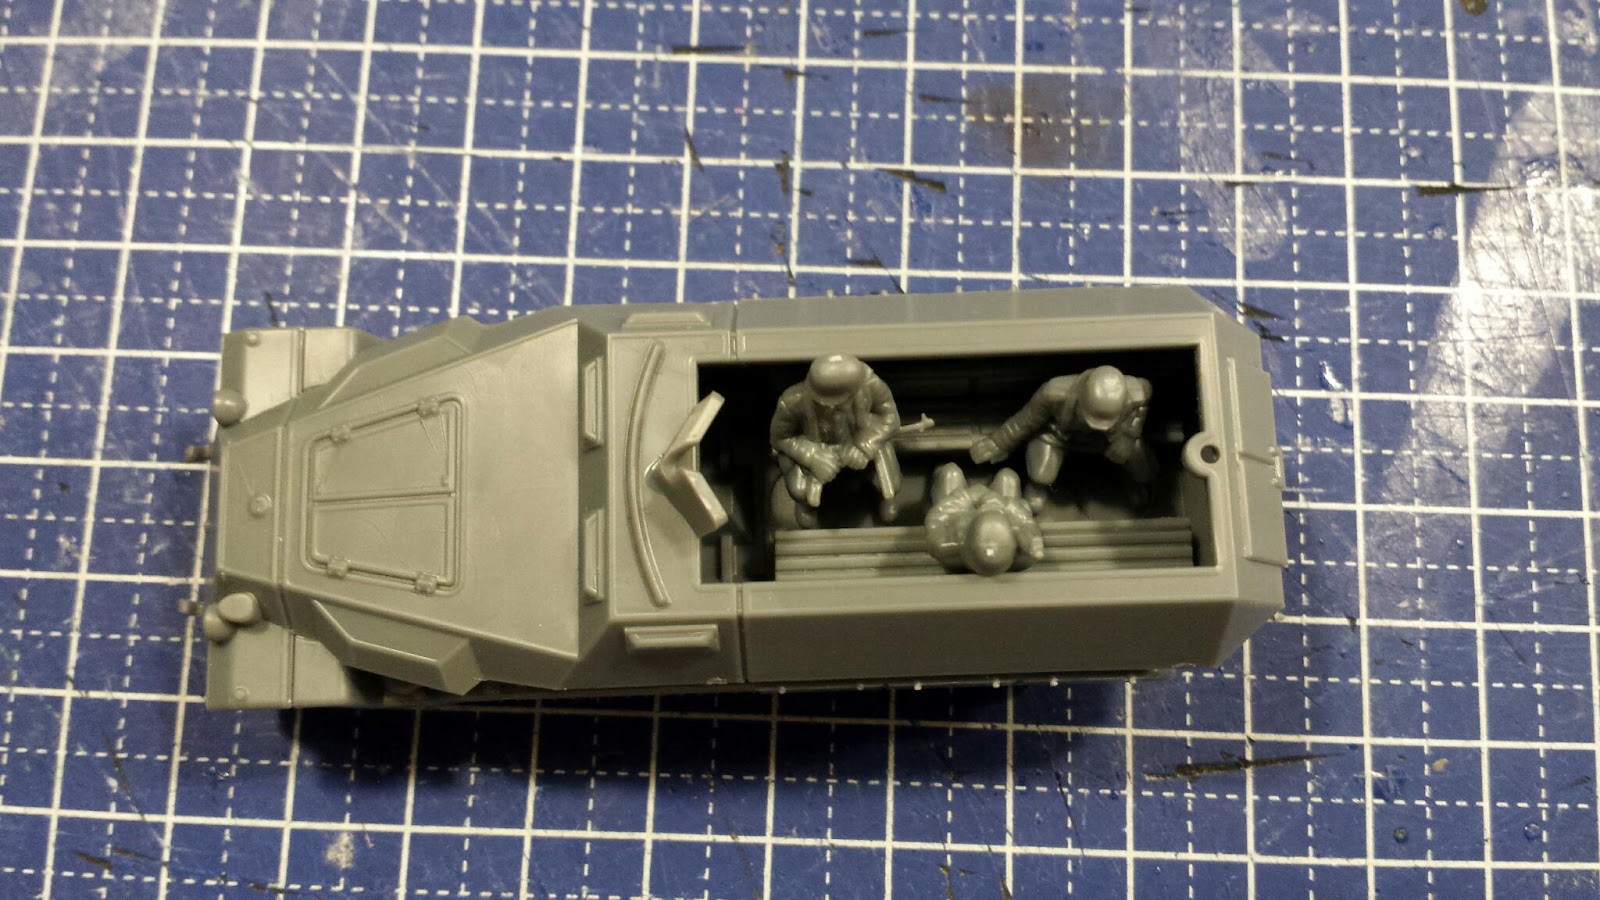
The box contains three Halftracks, each on their own sprue. Apart from the basic Halftrack, the sprue contains stowage, crew, spare weapons and the option to arm the model with a 37mm gun.
The sprues contain some nice bits of stowage, spare weapons and, more important, a lot of crew...
The model is designed for gaming and thus lacks the finer details like antennas and mirrors (you know, the stuff that breaks at the slightest hint of a touch)... It is very easy to build and goes together in just a couple of minutes. The material is what you would expect from a company like PSC, high quality and sturdy plastic.
The most fiddly parts, the machine guns, are even quite strong (I didn't even break one, yet...).
I left the top half of the Halftrack off, otherwise the inside is very difficult to paint (something I learned while painting the 15mm Halftracks). The magnet is used to keep my destoyed markers in place...
Together with it's smaller 15mm brother... The 15mm model is being painted, but is still a long way from finished.
As mentioned earlier, the Halftracks come with crew (I just noticed I still have to put in the driver). These models will be painted separately.
Final verdict? I am very pleased with the kit. Sure, you don't get rear-view mirrors (you want those, pick a brand like Italeri or Revell) but the kit is nicely detailed and very well suited to wargaming needs. The crew and stowage are both very nice and will help to individualize the otherwise identical models.