Showing posts with label PSC. Show all posts

Saturday, 21 March 2020

Review: 15mm British infantry and heavy weapons from Plastic Soldier Company

To serve as infantry support in my British/Canadian company I purchased two boxes of 15mm or 1:100 Late War British infantry and heavy weapons from Plastic Soldier Company...

A quick review of both boxes...


The Late War infantry box contains 144 models, including officers, PIAT-teams and light mortars. The models come in a nice variety of poses and the large number of miniatures means this box is enough to field a complete company of three platoons and command.


The Late War heavy weapons box contains Vickers HMG's, 3-Inch and 4-Inch mortars and a flamethrower. The set contains four of each of the heavy weapons, enough to provide the basic suport an infantry company needs.

Infantry sprue, fully packed with models...

Heavy weapons sprue...
As far as I can tell, uniforms and gear are all historically correct. Furtermore, the detail and character on these miniatures is very good.

Instruction manual... Quite straightforward...

For now I needed just a single platoon, but the rest of the models will be built as soon as I expand this company. I haven't even really started on the heavy weapons yet... The boxes contain enough models to build three platoons of infantry.

The completed platoon...
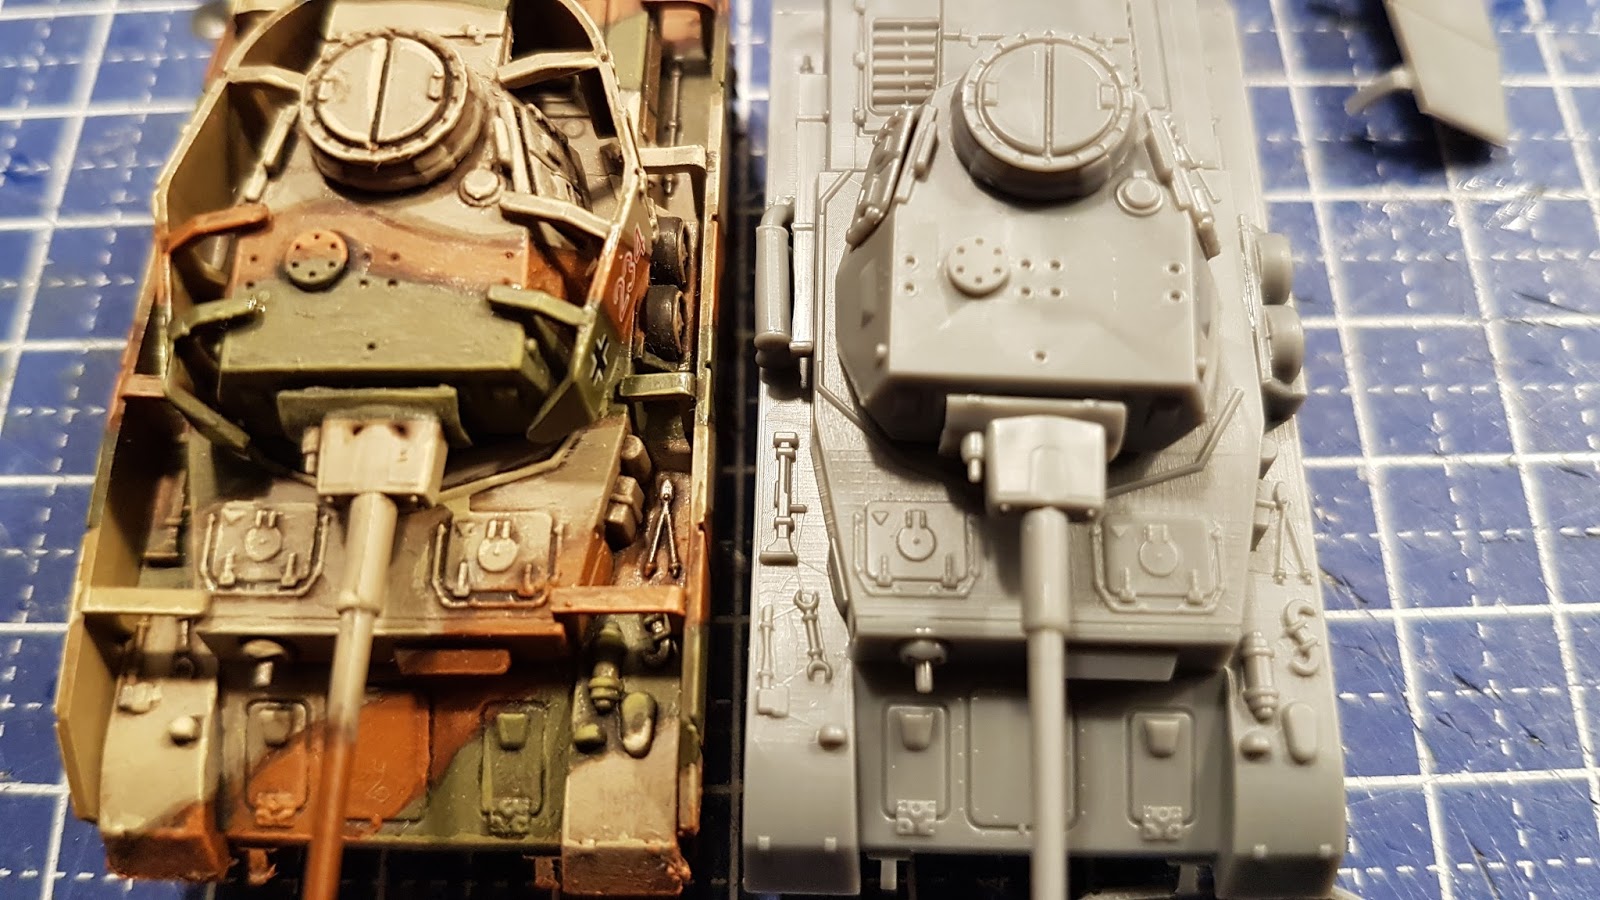
No PSC but 3D-printed... These Ram Kangaroos will serve as transports
for the infantry platoon...

The good
The boxes offer good value for money and cover all the basic needs whether you are starting an infantry company from scratch or just want to add some support to an armoured force...
The models are very detailed and I quite like the character of the models. I think these will paint up nicely.
The wide variety of poses means you can make each base unique.

The bad
None... Reallly? Nope... Well... Maybe... If I needed to offer some critisism it would be that some of the sprues had quite a bit of flash, but nothing that couldn't be solved with a sharp knife...

The verdict
PSC is always my first stop when it comes to buying 15mm miniatures. These Late War Brits are yet another great example of the quality PSC delivers. I will be back for more...

Monday, 16 March 2020

3D-printing tanks... pt. IV: Sherman Firefly

After the Canadian Ram, the Sherman Firefly is the next proper tank to come out of my printer...

Firefly in France...

These vehicles are going to be used in a new British/Commonwealth project. First on a small scale, individual tanks for games of What a Tanker!, but I aim to expand the set to a playable Company for games like Flames of War, I Ain't Been Shot Mum and Battlegroup.

Firefly taking cover... 

Lovely models, the prints came out great! 
Front and rear view of the model... 
The files for this model can be found here, courtesy of Thingiverse and the designer, m_bergman...

For the Firefly, too, I opted to use the 0.025mm resolution, further increasing the level of detail on these models. The prints are of a great quality, thanks to the level of the design. When painted, these will be hard to distinguish from a plastic or metal miniature.

Talking of paint... I have ordered a couple of new paints to get me started on this project. I also purchased a set of British infantry and some decals from PSC.

Next are two pictures comparing the printed model to a Firefly from my wargaming buddy. His painted Firefly is a plastic miniature from Battlefront.

The printed Firefly next to a plastic model from Battlefront... 
The difference in size and detail is negligible...

As with the Ram, I adapted the model to accommodate a set of magnets and I hollowed out the barrel and muzzle break...

The converted turret and hull to accommodate the magnets... 

The hollowed out muzzle break... 

Monday, 24 February 2020

Review: 15mm M60A3 Plastic Soldier Company

Work hasn't slowed down yet, but I desperately needed to do some hobbying...

I decided to build a 15mm or 1:100 M60A3 from Plastic Soldier Company, and because I thoroughly enjoyed building it I thought I should write up a little review... 

Because it is not connected to any of my current hobby projects, this kit has been sitting on my desk for quite some time now. A shame, really, as it is such a nice model...

The details...

The box contains five models...
The building instructions, as easy as it gets...
Both sides of the sprue... All the parts needed for one M60A3...

The tracks consist of two parts which easily snap together... 
There is no way to get this wrong... 
The headlights are a nice bit of detail... A pair of tweezers proved
to be essential here...
Crips detail and a tight fitting model kit...
The 'finished' product...
The model has two hatches that can either be modelled open or closed. For this first model I opted to keep all the hatches closed.

To put this tank together I used a sharp hobby knife, a pair of tweezers and a small drill. For the main construction I used plastic glue, which I always prefer when working with plastic. The magnets were glued with super glue.

After the main assembly I usually add a brass antenna, but I must somehow have misplaced my container of plastic and brass rods. This final detail will be added as soon as I find them again...

The verdict...

The kit has everything I have come to expect from a company like PSC, crisp detail, tight fitting parts, high quality plastic and not a single defect to be found... Parts like the headlights or the stowage rack at the back of the turret really add to the model.

The parts were completely free of flash, so getting them ready for assembly was as easy as cutting them from the sprue. The model is easy to build and goes together really well, if I hadn't magnetized the hull and turret I would have been able to assemble it in a couple of minutes. 

In addition to the complete vehicle, the kit comes with two crew and some additional stowage. 

The model is obviously designed for gaming, thus some of the smaller parts are a bit thicker than they should be, scale-wise. Fine by me, as I would end up breaking them if they were any thinner...

Extra work...

I took a minute to drill out the muzzle of the barrel. Nothing fancy, just a small hole to add some detail to the barrel...

Because of my slight magnet fetish I had no other option than to magnetize the turret and hull (not because the system provided doesn't work, because it does). It takes a little bit more time and effort, but this makes my tanks compatible with my smoke plumes, which, you guessed it, are also magnetized... I have a fair number of PSC miniatures in my Flames of War collection, and all have received a similar treatment.

Below you can see the extra steps I have taken to add the magnets...

Step 1: drill the holes...
Step 2: cover the holes...
Step 3: put the magnets in the holes...
As you see, it's not exactly rocket science... I use 5mm magnets and a 5.5mm drill. The white bits are just scraps of plasticard, cut to size. These are glued to the inside of the model to provide a surface to which the magnets can be attached.

Sunday, 10 November 2019

Cooling down from CRISIS 2019... The CRYPE is real! pt. III

Visited Crisis Antwerpen yesterday, and it was as good as ever... It must have been the 9th or 10th time I visited the show and it seems to get bigger and better every year.

This year, my main interest was getting some 6mm stuff. Several weeks ago I had placed a pre-order at Magister Miliitum. Quite ideal, as they have the option to pick up your order at one of the shows they visit. They had the order ready, neatly packaged, 100% complete and including the original order form.

About 2/3 of that order was for me, the remaining 1/3 was for my battle buddie. He ordered Early War French and British miniatures...

A total of 21 blisters of GHQ Micro Armour, my part of the order...
All Early War Germans.
I have already begun assembling and painting these, but that's something for another post...

Next on my list were some rulesets... I picked up the Crossfire rulebook first, which actually looks more like a magazine than a proper book; all black and white, soft cover and staples...


Astoundingly, this cost me €30,- I really hope the rules are as good as I have read/heard them to be...


Funny enough, I also paid €30,- for the two hardback, full colour Battlegroup books (picked those up at the PSC stand)... About 200 pages each, filled with interesting background information on the theatre, army lists, scenarios and inspiring pictures. I only intended to replace my digital rulebook with the paper one, but couldn't pass up on their special CRISIS offer... The army lists from both these books (Tobruk and Torch) should be compatible with our Seelöwe campaign...


And right across from the guys from PSC was the trade stand from Too Fat Lardies, where I purchased the I Ain't Been Shot Mum book. Forgot to pick up the cards though...

Next was some paint for my Early War German Panzers and Infantry, which I picked up at Foundry.


And last in the bag were some packs of grass tufts...


All in all a good haul! Assembling and painting the Micro Armour has started and we are getting ready for our first 6mm game.

Already looking forward to CRISIS 2020...

Thursday, 31 October 2019

Gearing up for CRISIS 2019... The CRYPE is real! pt. II

Only a week and a half before CRISIS 2019 is upon us! The CRYPE is slowly taking over...


Apart from the pre-order of GHQ stuff from Magister Militum I mentioned last time, I intend to pick up several rulebooks for use with my 6mm project... I will most likely be picking up a Battlegroup rulebook (or two) at PSC, along with a bag of 1:300 plastic aircraft. I Ain't Been Shot Mum from Too Fat Lardies is also on my shopping list (as a bonus, these two traders are placed right next to each other). I  also hope to pick up a copy of Crossfire...

I just found out that Baccus won't be present at CRISIS this year... Too bad, as I was looking forward to seeing their miniatures up close and getting some of their 6mm livestock. No problem though, I suppose I will be picking those up online.

On the 28mm part of the hobby I hope to find some more cool furniture and bits for my HirstArts Dungeon.

For 15mm I will be visiting PSC for some plastic kits, both PSC and Zvezda...


Saturday, 21 September 2019

Gearing up for CRISIS 2019... The CRYPE is real!

CRISIS 2019 (Mainland Europe's largest Wargaming convention, organised every year in Antwerpen by the wonderful people of TSOA) is just six weeks away, so it's about time to get a proper shopping list ready...

I have been to CRISIS for more than a decade now and it's interesting to see that my enthusiasm for Wargaming hasn't diminished in the slightest, but the focus is ever shifting...

All those years ago I was playing mostly Fantasy games (WFRP, Warhammer Fantasy, Mordheim), at that time I was already building the Dungeon, so I only bought stuff related to that. After that came Flames of War, and for several years I mostly bought 15mm miniatures.

And now there is this new project, 6mm WW2... I intend to give all the stands selling 6mm/1:285 miniatures my full attention. I am somewhat ashamed to say that in all those previous years I mostly skipped anything smaller than 15mm, writing it off as way too small. How things can change...

As always, I will be looking for furniture and other cool stuff to put in to the Dungeon. But this year I will be mostly getting some 6mm miniatures to use with my new Hex terrain. While I love being surprised by finding cool stuff I am not taking any chances and will place a rather substantial pre-order at a merchant who stocks GHQ Micro Armour...

Saturday, 7 September 2019

Into 6mm wargaming...

So, on to a new project!

WW2 Wargaming and modelling has been a hobby of mine for years, and recently I decided to get into 6mm Wargaming. Both as a challenge to paint (because 6mm is small, very small) and an excuse to start making a whole new set of scenery and terrain.

I ordered two of the sample packs GHQ offers, just to get an idea of the scale and level of detail of these models (and to get my gaming buddie all fired up with a few small Russian Tanks). These models are incredibly detailed, maybe even more so than some of my 15mm miniatures...


In the background is a 15mm PSC Tiger... The GHQ Tiger still needs some proper cleaning, but the cast is extremely sharp and the amount of flash is minimal... This Tiger is, for want of a better word, CUTE!

One of the main reasons to embark on this new project is definitely the chance to make some new terrain. For this, my attention was drawn to Hex terrain. GHQ has their own system (which is pretty solid), but as I live halfway across the globe, shipping is not an option... Besides, where's the fun in that? I like to make my own terrain! So I went in search of a way to make my own Hexes, and boy, did I find one...

I found a review of the Hex Terrain Toolkit and from there it all went Hex-shaped...

The Toolkit consists of a wide selection precise laser cut plywood pieces with which you can make a whole range of different pieces... For now, I will concentrate on plain Hexes, rivers and hills.

The Toolkit, fresh out of the box...

The Toolkit is meant to be used with a handheld hot wire cutter. I have a Proxxon hot wire cutter with a table, but with some very minor adjustments to the kit I made it work just fine... I use high density insulation foam, but any kind of styrene will do.


Once you get the hang of it, cutting basic Hexes is quite easy and within a couple of hours of cutting I had around 100+ to start with. As can be seen on the picture, the Hexes are absolutely precise!

Besides the Hexes, I intend to make all the other scenery from scratch... Houses, trees, you name it...

Some of the buildings I made, in varying degrees of being finished. All are made from high density foam... I had to wait a couple of days for my toolkit to arrive, to kill the time I experimented a bit with my wire cutter, making a lot more buildings than I originally intended.

The first batch of trees... Some individually based, some in small groups. The trees are made from thin wire and clump foliage. More trees will be added, both as separate pieces and fixed to the Hexes.

The start of a winding river, complete with a water wheel and a bridge. More bridges will certainly be added.

I chose to draw the roads straight onto the Hexes rather than adding them as separate pieces on top. Note that these Hexes don't have a foundation of snowflake-Hexes yet, so they don't line up as neat just yet... Difficult to see, but the last row of hexes are actually hills, the transition from flat Hexes to hills is very smooth.

The first few finished Hexes... On this picture you can still see the glue underneath the grass as it hadn't properly dried yet.


Saturday, 20 January 2018

PaK 40 auf RSO

Between tournaments I will be building a new Platoon of Veteran Tank Hunters of PaK 40's auf RSO.

Those Germans put PaK 40's on everything that moved...


PSC offers a great kit that includes parts to make a PaK 40 and three versions of the RSO (Raupen Schlepper Ost), one of which is the PaK 40 auf RSO. Sadly, you cannot build them both at the same time.

Fortunately I had a couple of spare PaK 40's from the Battlefront Puma kit. These are a perfect fit.

I previously built the PaK's to go with my Grenadiers (which are going to be painted soon, I swear).

Neatly magnetised with magnets that are way too small...


Monday, 15 January 2018

Review: 15mm Panzer IV Plastic Soldier Company

Now that my Company is ready for it's first tournament I figured I could do with another review... I need another Platoon of Panzers for the next tournament. Besides, you can never have enough Panzer IV, and I really like this kit...

This is by no means a new kit, as it has been around for a couple of years now (according to the PSC website it was released back in 2011). 

The Panzer IV from PSC comes in a box of five (they are also available seperately). The box will retail at around £20,00.

The PSC Panzer IV kit allows you to build three different variants: the Panzer IV Ausf. F1/2, G and H. Suitable for service in mid to late war.

I will be building the Panzer IV H as an addition to my -all plastic- German Flames of War Company.

The sprue is packed with options to build all three different variants, two crew and some optional stowage, like spare tracks and jerrycans... The box also offers a one-piece track option, which is very nice. Especially the older PSC kits have tracks that are made of several parts, nothing too difficult, but the single piece saves some time.

All parts cut out of the sprue and laid out... To the left are all the pieces that are extra, either as optional stowage or those that are needed for the other variants.


The PSC Panzer IV uses a straight-forward pin and hole to connect the turrets to the hull. I prefer to magnetise all my models. This step takes a bit more time, but ensures for a smooth turnable turret and lines up with my magnetised smoke plumes which I use as destroyed-markers...

The rest of the kit goes together in just a couple of minutes. For this I highly recommend plastic glue!

All the parts fitt really well, there are no glaringly visible gaps. The Schürzen will be glued on after painting, but could also be glued on prior, whichever has your preference...

This wasn't my first Panzer IV from PSC... 

I don't know if it's a deliberate fix or just a happy accident, but the dimples in the gunmount are gone... All my previous models 'suffered' from this little flaw.

Pro's:
Highly detailed yet easy to build
Three variant options, crew and some optional stowage
Doesn't cost an arm and a leg

Cons:
The box comes without any decals